
OpenGL 1: 1: Exactly One Triangle
Continuing from where we got to in Chapter 0 we have a blank window that we can close. Not setting the world on fire quite yet. In this chapter we’re going to cover the very basics of displaying something with OpenGL and introduce the fundamental concepts involved. This is possibly the most important chapter as we’re going to cover transfering data to the GPU and having it draw something- pretty much the entire purpose of OpenGL! You’ll want to come back to this chapter later to make sure everything has stuck properly.
Unfortunately the setup and leg-work required by OpenGL just to display a triangle is rather substantial. We’re going to be introducing a lot of new topics so don’t be afraid to take breaks to give them time to sink in. Future chapters will be focusing on specific parts of the whole process introduced here.
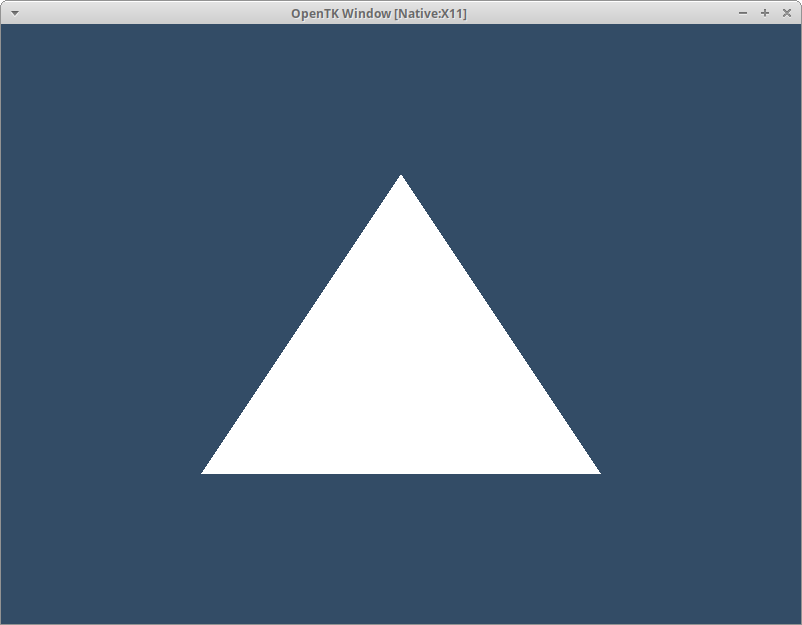
As before lets see what we’re working towards for this chapter. Set your expectations accordingly!
A Regular Shade Of The Colour Blue
Having a window that only displays what was underneath it isn’t very useful so we’ll start by improving that. We’ll be adding to the existing code in two places pretty regularly so lets clarify them now. One is after the setup work to make OpenGL available but before the main loop so we’ll call this area setup. The other is inside the main loop after the events have been processed and we’ll call it loop. Here’s the full code with both areas commented to make sure we’re starting together:
private static void Main(string[] args)
{
    ToolkitOptions options = new()
    {
        Logger = new ConsoleLogger()
    };
    Toolkit.Init(options);

    OpenGLGraphicsApiHints hints = new ();
    WindowHandle window = Toolkit.Window.Create(hints);
    OpenGLContextHandle context = Toolkit.OpenGL.CreateFromWindow(window);

    Toolkit.OpenGL.SetCurrentContext(context);
    OpenTK.Graphics.GLLoader.LoadBindings(Toolkit.OpenGL.GetBindingsContext(context));

    Toolkit.Window.SetMode(window, WindowMode.Normal);

    void HandleEvents(PalHandle? handle, PlatformEventType type, EventArgs args)
    {
        switch(args)
        {
            case CloseEventArgs closeEvent:
                Toolkit.Window.Destroy(window);
                break;
        }
    }

    EventQueue.EventRaised += HandleEvents;

    // setup code

    while (true)
    {
        // loop code
        Toolkit.Window.ProcessEvents(false);
        if(Toolkit.Window.IsWindowDestroyed(window)) break;
    }
}
Luckily for us OpenGL has a way for us to clear the screen of whatever data was there with a single colour. It’s going to be our first GL command so there’s more to cover than you might expect. The name is pretty close to what we’re looking for: ClearColor so lets try adding it to the setup code:
// setup code
GL.ClearColor(0.2f, 0.3f, 0.4f, 1.0f);
If you copied this in then you’ll have some red squiggles for company and if you tried to type it you’ll have been given a bunch of options of what to import. OpenTK 5 supports 4 different flavours of OpenGL and it’s critical we pick the right one so: what are they and why should you use them?
OpenTK.Graphics.OpenGL- Modern OpenGL supporting version 3.0 onwardsOpenTK.Graphics.OpenGL.Compatbility- Legacy OpenGL before version 3.0OpenTK.Graphics.OpenGLES1- GL for Embedded Systems 1.0 & 1.1OpenTK.Graphics.OpenGLES2- GL for Embedded Systems 2.0+
If you cast your mind back to the intro we want to use 3.3 so add the using for plain OpenGL. Hopefully all the errors go away so we can run the project again and check the result. Unfortunately nothing has changed - why not? We need to understand how OpenGL behaves which isn’t as straightforwards as you might hope. When a call is made to OpenGL it’s not directly applied to the GPU but applied by the driver to a state machine. Managing this state machine is what makes OpenGL unique and sometimes a challenge to work with!
We’ve told OpenGL what colour we’d like to clear with so how do we use it? Here comes GL.Clear to the rescue but unfortunately it needs a little more from us in the shape of a ClearBufferMask. We’re going to be using ColorBufferBit and leave the other choices for later. It’s important that we do this before we do anything else each frame so this goes at the start of the main loop.
// loop code
GL.Clear(ClearBufferMask.ColorBufferBit);
Run your project now and oh… we still don’t have any blue why is that? OpenGL is set up to use Double Buffering which separates the data being set to the display from the data being written to by the GPU. We’ve cleared the Back buffer but the Front buffer is being shown. Swapping buffers isn’t a GL operation it’s handled by the OS so we find our method on Toolkit.OpenGL named SwapBuffers. We need to tell it which buffers to swap by providing the context we set up earlier.
// loop code
GL.Clear(ClearBufferMask.ColorBufferBit);

Toolkit.OpenGL.SwapBuffers(context);
Woo we’ve finally done it!. Enjoy this regular shade of blue and take a moment to relax. We’ve had to cover a lot to get this far but now we know a little more about how OpenGL works.
C Neutral
Now we’ve looked at a few OpenGL calls, they’re the ones that start with GL, it’s a good time to look at the actual OpenGL API. We can view the complete OpenGL API over on the Khronos Group’s website. They’re the people responsible for developing and maintaining the OpenGL standard along with a host of other projects. You can start at the top or browse the raw list.
Lets look up the Clear function to try and find out what the buffer mask bit is all about. As almost every function begins with gl that part isn’t used by the index so we’re looking for C. glClear gives a pretty reasonable explanation of what we’ve just done:
glClear sets the bitplane area of the window to values previously selected by glClearColor, glClearDepth, and glClearStencil. Multiple color buffers can be cleared simultaneously by selecting more than one buffer at a time using glDrawBuffer. glClear takes a single argument that is the bitwise OR of several values indicating which buffer is to be cleared.
Now we know the ClearBufferMask is controlling which of the three parts of the screen buffer are being cleared: Color, Depth or Stencil. Since we’re not using the other buffers yet we don’t need to worry about clearing them and can avoid doing bitwise work.
The official documentation can be quite overwhelming at first but as you gain more familiarity with OpenGL it’ll start to make quite a lot of sense. Being able to look up functions in the reference pages is a skill you need to develop just as much as how to use OpenGL.
OpenTK automatically generates its API from the official spec which roughly results in the C version glFunctionName becoming GL.FunctionName. Once this clicks you’ll find it surprisingly easy to replicate any of the C or C++ code you come across in C#. Alongside the functions OpenTK also generates specific enums for each method to help with compile-time safety. We’ve used the ClearBufferMask enum which contains the 3 masks mentioned in the documentation. A similar process is used to remove the GL_ and other underscores so GL_STENCIL_BUFFER_BIT becomes StencilBufferBit. In the very rare case of a specific enum being missed within OpenTK you can find everything on the All enum. Finally the inline documentation for OpenTK’s enums should give the name of the original C value.
ClearBufferMask.ColorBufferBit = 16384[requires: v1.0] Original was GL_COLOR_BUFFER_BIT = 0x00004000
We could replace our specific enum with the global enum through a bit of casting magic GL.Clear((ClearBufferMask)All.ColorBufferBit); but in general this shouldn’t be required. If you come across a method that’s missing an enum raise an issue.
It’s good practice to look up every function we use from now on in the official docs to start building up a full understanding of OpenGL not just OpenTK.
What Is A Triangle?
“If you wish to make an apple pie from scratch, you must first create the universe”
Carl Sagan provides apt comparison for how much we have to do just to draw our triangle! Lets start by defining what a triangle is - three connected points. Now we have to ask ourselves where are these points? We know they should be on the screen but what does that mean to the GPU. To answer this we’re going to have to get comfortable with some maths.
To represent a position in space we must define a Coordinate System which is a way to uniquely determine a point’s position within a space. There are a lot of these systems and each comes with advantages and disadvantages which means we’re going to use more than one.
The first system we’re going to use is called Normalized Device Coordinates usually just NDC. This system defines a space in three dimensions - x, y & z - within the ranges -1.0 to 1.0. That means every point we define has 3 components that must be between -1.0 and 1.0. OpenGL uses NDC to represent the position of everything on screen with the origin point (0, 0, 0) being the centre of the screen. This is usually comes as a surprise to people new to OpenGL who are used to other systems that define the origin as top left or bottom left. If you’re used to those unfortunately this is something you’re just going to have to accept!
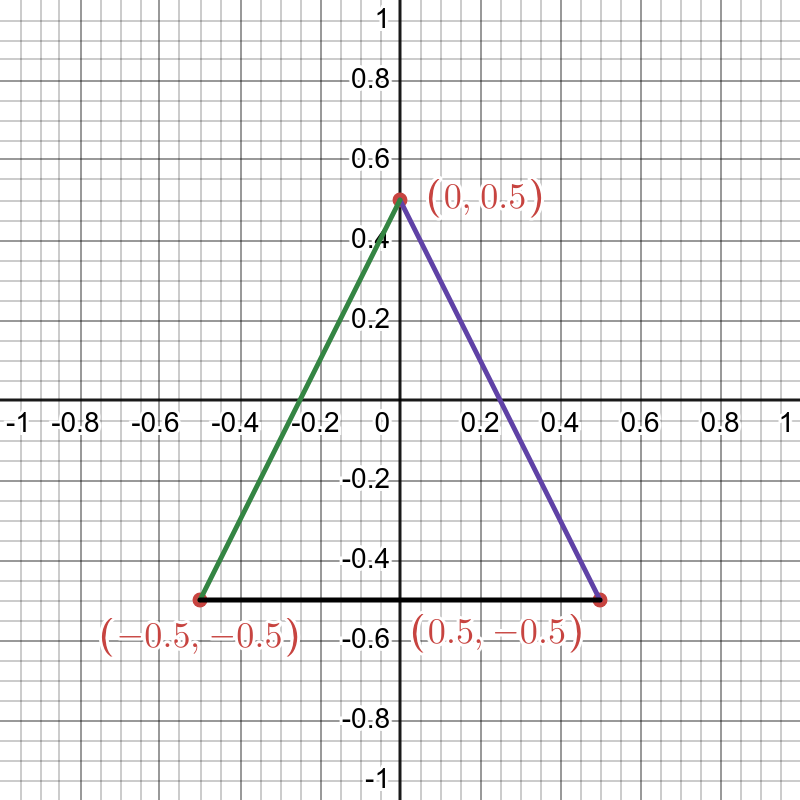
Now we’ve become best friends with NDC we can use it to define our triangle:
-0.5, -0.5, +0.0    // left
+0.5, -0.5, +0.0    // right
+0.0, +0.5, +0.0    // top
Lets look at those plotted out in NDC:
Calling these points in a space defined by a coordinate system is fairly wordy so from now on we’ll use the term Vertex. We still need to know what system a vertex uses but from now on we’ll be using the term very frequently. I’ll be using verticies as the plural of vertex but you can use vertexes if you want.
Shaders On
We know what we want to draw and where to draw it so: how can we draw it? It’s time to reveal powerhouse at the centre of OpenGL: Shader Programs. Shaders Programs, usually just Shaders, are the foundation of modern programmable graphics pipelines and are where all the magic happens. I snuck an important word in there, did you spot it, it’s “Programmable”. The programmable part of shaders that make them so powerful and they do with their own language: OpenGL Shading Language or GLSL.
GLSL looks a lot like C so it should look fairly similar to us C# developers and thankfully is missing all the memory & pointer details. Instead GLSL focuses on providing useful types and functions for graphics programming such as vectors and matricies that will feel very familiar. As we walk through writing our first shader you’ll discover how easy they are to write.
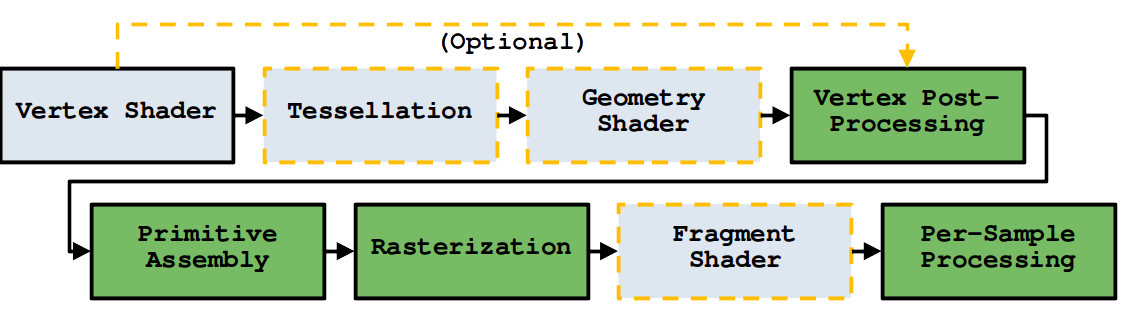
The OpenGL Pipeline represents all the stages that the GPU goes through when it draws anything. In a slightly confusing term both the entire group of steps and each individual step are called Shaders. While it might look long and complex to begin with there are only two mandatory stages: Vertex and Fragment. Technically the Fragment stage is optional if you don't want to see anything but as we do it's effectively mandatory! To display our triangle we’ll have to work out what to do in each of them.
We called each point a vertex before and it’s not a coincidence the term has popped back up. Vertex Shaders run for every vertex we want to draw and its their job to tell the GPU where in NDC the vertex should go. Let’s take a look at the most basic valid shader program to see it in action:
#version 330

void main ()
{
    gl_Position = vec4(0.0, 0.0, 0.0, 1.0);
}
We haven’t gotten to the point where we can run our own shader programs so you’ll just have to trust me that this draws every vertex at the centre of the screen. Let’s take a brief look at each line and find out what they all do.
#version 330
At the top of every shader program is a version declaration which specifies what version of GLSL is required. The early versions of OpenGL had slightly funkier version numbers but thankfully this was adjusted so 330 of GLSL matches 3.3 OpenGL. If you don’t include the version declaration you’ll get 110 and everything will break so don’t forget it!
void main ()
Seems familiar? This is a function declaration with a void return type and main for a name. Every shader program needs exactly one of these and they serve as the entry point just like they do in C or C#. Look back at your C# and spot the void Main sitting up at the top - it’s the same thing. As you’d expect we can create our own functions using the same template but for now we’ll stick with just main.
gl_Position = vec4(0.0, 0.0, 0.0, 1.0);
Unlike the other lines this one’s not quite as obvious; what’s gl_Position and where did it come from? GLSL provides a number of predefined variables to each shader program. Some of these contain useful info and others need to be filled in by our code. gl_Position holds the vertex position in NDC and it’s the vertex shader’s primary job to fill in this value. On the other side is vec4(0.0, 0.0, 0.0, 1.0) which is the constructor for a vector with size 4. You might find it weird that we specify the position with 4 values despite being in 3D space but there are advantages which I’m not easily able to explain! Finally we have a venerable ; semi-colon to close out the line. Just like C and C# every statement must be terminated by one.
This Vertex shader is one half of the mandatory pair so lets quickly look at the most basic Fragment shader. While we had a pretty good definition for vertex the term fragment has snuck up on us. Each fragment is the interior area of a triangle as it appears on screen. Unlike the vertex shader which run once per point the number of fragment shader runs depend on how big the triangle is and can be anywhere from zero to hundreds of thousands of times!
#version 330
out vec4 fragColor;

void main ()
{
    fragColor = vec4(1.0);
}
We’ve seen a few of these lines before so I won’t go over them again. Lets look at the first new one:
out vec4 fragColor;
You’ve already met vec4 so we know this is another size 4 vector but what does out mean? Shader programs communicate with each other along the pipeline by passing values along. Each shader can declare an output value using the out keyword as we’re doing here. There’s a matching in keyword to receive them which we’ll use later on. Feels familiar to in and out used by C# for passing parameters to functions doesn’t it?
fragColor = vec4(1.0);
With the fragColor defined we assign its value by using a single parameter constructor. This is shorthand for vec4(1.0, 1.0, 1.0, 1.0) and is a useful little shortcut to know.
A common question at this point is how does the GPU know that this fragColor is the value to use when filling in the fragment; can we have multiple out values or what if we don’t have any? Unfortunately the answer to both of these is quite complex and won’t make sense in the context of this chapter. You can check out the wiki on Fragment Shaders but don’t feel like you need to understand any of it!
Now we know a little about shader programs and GLSL lets get started on writing our own.
The Interesting Bit
We know where our triangle vertices should go and that the vertex shader is responsible for this so how do we make it work? I’m going to break from tradition and show the complete vertex shader first then explain how it works:
#version 330

vec3 verticies[3] = vec3[3](vec3(-0.5, -0.5, 0.0), vec3(0.5, -0.5, 0.0), vec3(0.0, 0.5, 0.0));

void main ()
{
    gl_Position = vec4(verticies[gl_VertexID], 1.0);
}
Before we go through the code can you work out what’s going on? Remember you can look up things on the reference pages or the wiki.
We start by declaring an array of the previously seen vec3 types with a length of 3. This way of declaring arrays is very C so should be acceptable for us C# developers. On the right hand side we’re constructing a new array and filling it with 3 vertexes. Can you write the same code in C#?
Instead of a single value we’re using our new verticies array with another built in variable gl_VertexID. This variable is an int and is controlled by the draw command. We haven’t gotten to that yet so you’ll have to store this in your own memory and recall it later on. We’re also using a new constructor for vec4 which looks like vec3, float; almost every combination of constructors is possible for the vector types.
Unlike the vertex shader the fragment shader doesn’t need any additions:
#version 330

out vec4 fragColor;

void main ()
{
    fragColor = vec4(1.0);
}
With our triangle data hard-coded into the vertex shader we now have to find out how to tell the GPU to run our shader programs.
A Brand New Class
It’s time to snap back to reality and into our C# project again. We need somewhere to do the work required to get our shader program over to the GPU. To do that we’ll create a new class and call it the unimaginative Shader and as is tradition put it in a new file - Shader.cs.
class Shader
{
}
Does yours still have the fresh class smell? We’re going to start by adding two private strings to hold the source code of our shaders:
class Shader
{
    string vertex = @"
#version 330

vec3 verticies[3] = vec3[3](vec3(-0.5, -0.5, 0.0), vec3(0.5, -0.5, 0.0), vec3(0.0, 0.5, 0.0));

void main ()
{
    gl_Position = vec4(verticies[gl_VertexID], 1.0);
}"

    string fragment = @"
#version 330

out vec4 fragColor;

void main ()
{
    fragColor = vec4(1.0);
}"
}
We’re using the verbatim string literal style of strings with the @ at the start to preserve new lines. Once you complete this chapter try experimenting with different ways of loading the shader source code.
Now is a good time to head back to your Main method and summon up a new instance of this class. Where do you think it should go? It’s part of the setup code so place it ahead of the existing ClearColor call:
// setup code
Shader shader = new Shader();
GL.ClearColor(0.2f, 0.3f, 0.4f, 1.0f);
All the setup work is done! It’s time to get our hands dirty and write the code that will send our shader code to the GPU. We’ll start by adding a public method called Setup to our class. It’s good practice to avoid interacting with OpenGL in your constructor as doing so requires an active context. At the same time we will add the same using OpenTK.Graphics.OpenGL; to the top of this one.
As we’ve discussed the OpenGL Pipeline is made up of multiple stages each with its own shader program and only once these are all joined together can we create a full shader. We’re going to be doing exactly this with our code and start by creating a new shader.
public void Setup()
{
    int vertexHandle = GL.CreateShader(ShaderType.VertexShader);
}
Unlike C# we don’t get the newly created shader object back but instead a handle that we can use with other functions. We saw the full pipeline earlier and looking at ShaderType we can see all of these and more. Now we have a handle to the vertex shader we need to provide the source code. Thankfully there’s a function exactly for doing that ShaderSource which requires the handle and the code:
GL.ShaderSource(vertexHandle, vertex);
Now we can compile this shader using CompileShader and hope for the best! We don’t get any feedback about any errors at this stage so for now you’ll just have to trust me. Lets do the same process for the fragment shader:
int fragmentHandle = GL.CreateShader(ShaderType.FragmentShader);
GL.ShaderSource(fragmentHandle, fragment);
GL.CompileShader(fragmentHandle);
In order to join these two compiled shaders into a complete Shader Program we need to perform a Linking step. If you’ve done any C programming you might remember this but for C# developers it’s done automatically. As we only have one of each type this step feels a bit dramatic but as you progress into graphics programming you’ll find opportunities where mixing different shaders makes sense.
To get ready to link somewhere for it to go - that’s the Shader Program - which we create with CreateProgram. We then attach the shaders we prepared earlier with AttachShader. Remember we declared what type those shaders were when we created them so OpenGL knows where to slot them in now. Once we’ve fed in everything we’ve made the final step is to link them with LinkProgram.
int shaderHandle = GL.CreateProgram();
GL.AttachShader(shaderHandle, vertexHandle);
GL.AttachShader(shaderHandle, fragmentHandle);
GL.LinkProgram(shaderHandle);
Now the full Shader Program is ready to go we no longer need the two shaders that went into it. Unlike C# there’s no Garbage Collector in OpenGL so we’re responsible for keeping track of unused resources and deleting them. Before we can delete them we need to detach them as the main Shader Program is going to hang around for the rest of our program. After which we can put them up on the chopping block and delete them. The methods for these two predictably called DetatchShader and DeleteShader:
GL.DetachShader(shaderHandle, vertexHandle);
GL.DetachShader(shaderHandle, fragmentHandle);
GL.DeleteShader(vertexHandle);
GL.DeleteShader(fragmentHandle);
Finally we need to tell OpenGL to use our Shader Program for whatever it is we get up to next. If you cast your mind back to when we set up the clear color behaviour OpenGL retains state and that includes the active Shader Program. Handling which shader is active is a significant part of maintaining performance within OpenGL. For now we’ll use our newly formed program right away.
GL.UseProgram(shaderHandle);
Don’t forget to also call the new Setup method back in the main part of the application!
// setup code
Shader shader = new();
shader.Setup();
GL.ClearColor(0.2f, 0.3f, 0.4f, 1.0f);
With everything set up we can get ready for the main event. Remember you can check the complete code at any time.
The Draw
We’re ready to put it all together and view our very own triangle. To do so we need to tell OpenGL to draw something and that kicks off the pipeline we’ve been studiously filling out. As drawing things is one of the main features of OpenGL there’s a plethora of ways to make it happen. Try typing GL.Draw and see what comes up in the list. It’s pretty crazy!
We’re going to be using DrawArrays as our command. Once we get see our triangle you can check out the full documentation. For now you’ll have to trust me we’re using it correctly. There are three arguments to fill: PrimitiveType mode, int first and int count and we’ll handle them in order.
Primitives describe the way set of verticies are understood by the GPU. Have a look at what values exist on PrimitiveType you might be familiar with a few already. We’re going to be picking the venerable Triangles for our situation. As you explore graphics programming you’ll find examples of the others.
The start value will be 0 as we want to draw all of the values stored in our shader. It might seem crazy to skip verticies while drawing but when you do you’ll be real glad this argument exists.
Remember a few sections ago when we created that verticies array in our shader code and put 3 in it? This is the part where we line those up and ask for 3 to be drawn. Once we see our triangle come back to this part and experiment with different values to see what happens.
// loop code
GL.Clear(ClearBufferMask.ColorBufferBit);

GL.DrawArrays(PrimitiveType.Triangles, 0, 3);
Did you try running the project already? If you did you’ll be quite disapointed as there’s no triangle! I prommised you a triangle and it’s not there so what’s going on? There’s a small quirk within the OpenGL spec that requires something called a Vertex Array Object to exist before any draw call will work. We’re going to look at these in detail in the next chapter but for now you’ll need to create one and bind it in the setup code:
// setup code
Shader shader = new();
shader.Setup();
GL.ClearColor(0.2f, 0.3f, 0.4f, 1.0f);

int vao = GL.GenVertexArray();
GL.BindVertexArray(vao);
If you haven’t gotten a triangle don’t panic. Everything has to go right for this to work and it’s surprisingly for common for things to go wrong. Check your code against the source first then if you still can’t get it to work the best place for advice is on the Discord.
Recap
Phew! What a lot of work to display just a single triangle. We’ve covered what OpenGL versions there are; how to send commands so we can clear the screen; the basics of shader programming and how to use them and; how to draw a triangle.
Armed with everything you’ve learned try experimenting with different shapes and colours. Do the other primitive modes produce anything interesting? What happens if you make a mistake in your shader code - something we’ll cover in the next chapter.
With this step taken you’re on your journey to creating all sorts of graphical programs and soon the entire power of OpenGL will be yours to command. It might feel difficult at times but keep going - you’ve already done the hardest part!
Continue with Chapter 1.5: Errors
Originally published on 2025/04/22